Molten Bronze Pour

On the first weekend in August 2011, Monash University along with a number of other Victorian Universities held an Open Day, where visitors were encouraged to tour the facilities and learn about the courses offered there.

The furnace
The furnace.

We were visiting the Caufield Campus of Monash University where we were privileged to observe a molten bronze pour in the Sculpture Department of the Visual Arts buildings.

Our guide through the process, Alex, was one of the technical staff actually involved the pour.

Click on any of the images in this article for an enlarged view.

This event was the culmination of up to six weeks work by the sculptors – creating the original master, preparing the mold using the lost wax technique, and baking the reinforced plaster mold in the kiln ready to receive the molten bronze.

Heat rising from the furnace

The gas fired, air injected furnace itself was noisily spewing green flames, a sure sign of vaporizing copper. Ingots of bronze and sprues from previous pours sat on the rim of the lid, waiting their turn to be placed in the crucible.

The heat radiating away from the crucible was captured much more dramatically in these images than was visible to the naked eye at the time.

Adding more bronze
Adding more bronze

Periodically one of the pour team members, John, would add more bronze, skim impurities off the surface and check the crucible temperature using a high temperature probe placed briefly into the crucible, and connected to a wall mounted digital display.

The furnace heated the bronze-filled crucible to nearly 1200°C over the space of a few hours.

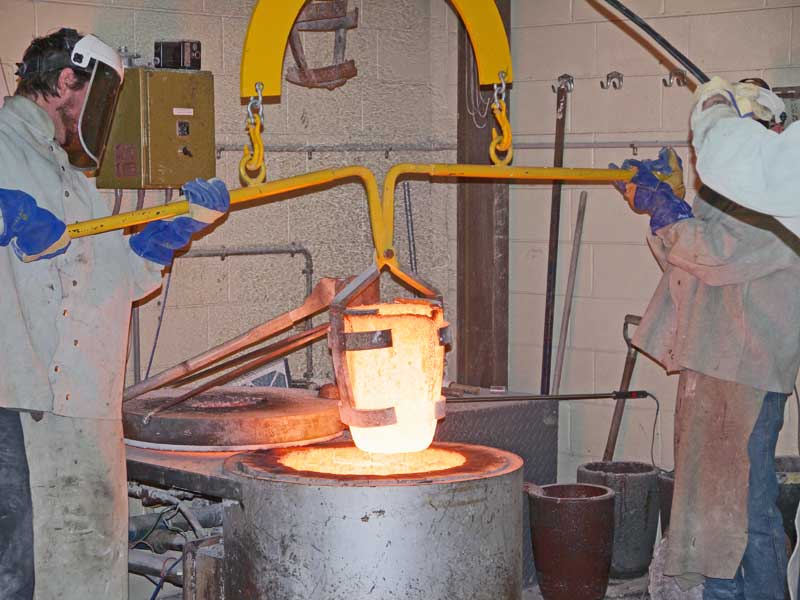
When Alex and John were satisfied the temperature was “right”, the noisy forced air injection was turned off and  the lid moved aside. The crucible was lifted clear of the furnace using an ingenious hand operated lifting frame suspended from an overhead electric crane.

Lifting the crucible.
Lifting the crucible
Out of the furnace
Out of the furnace
The crucible in it's cradle


The glowing hot crucible was lowered into another frame and secured for the pour. It was a two man effort by Alex and John to guide the crucible, while the third member of the team, Evan, operated the overhead crane, following instructions from Alex.

Pouring bronze into molds

Alex judged, from years of experience, when the temperature and behavior of the molten bronze was suitable for pouring into the prepared molds. The best temperature varies depending on the nature of the object to be cast – it’s size, complexity and inherent characteristics. The last piece to be poured, also the largest, was described as “organic” and required a “cooler” pour.

The molds were all arranged on a bed of sand which provided a buffer for the molds and a soft, absorbent surface for any molten metal spills.

The last mould is poured.

Watching the red hot bronze being poured into the molds was exhilarating.

With the time and effort required to prepare the original sculptures and their molds, the team usually try to have more molten bronze than necessary rather that run out part way through a pour. The extra molten bronze simply gets poured into molds to solidify into ingots for the next project.

At the end of the pour the crucible was returned to the safety of the now inactive, but still extremely hot, furnace. The molds meanwhile all had their filling sprue cups glowing with red hot bronze.

Pouring the bronze ingots
Filling cup and air holes
Looking into the furnace


Alex then pulled over a mold that had been poured previously and was now well and truly set and cooled. He demonstrated how the mold was broken to safely release the sculpture and filling sprue.

Breaking the mold
Breaking the mold
To release the sculpture
Chipping away the plaster


The sculptures however are not yet finished at this point. The sprue has to be cut off, and the surface repaired to match the rest of the sculpture as if the sprue had never existed. In the case of the sculpture Alex released, it had more work to be done to add a separately cast piece that was just too difficult to pour in the original mold.

Then the task of cleaning and applying the patina can start.

The sprue itself goes back for recycling in a future bronze pour.

Alex with the cast sculpture

The journey from concept to final completed sculpture is long and involved. I feel privileged to have witnessed a small and spectacular part of that process.

A very big THANK YOU to Monash University – Caufield Campus, the Faculty of Art and Design, and especially to Alex, John and Evan.

And a special thank you to Rachael for inviting us.

A New Twist on Wool Dyeing

Lesson samples in the stockpot

Last weekends dye session was surprising and interesting to say the least.

The actual dyes for the most part were little different from the previous two sessions, only the pre-treatment techniques changed.

This time the Merino roving was twisted, knotted, tied and clamped to see what the application of a few Shibori techniques would produce with acid dyes.

As an aside, the Procion MX dyes that were made up two weeks ago to “age” were brought into play in a demonstration of using the chemically reactive MX dyes as acid dyes.

Twisted, knotted, tied and clamped.
Twisted, knotted, tied and clamped. (click to enlarge)

Pieces 1 to 4 – normal acid dyes

Four lengths of Merino roving were either twisted, knotted, tied with twisty-ties or clamped between solid blocks prior to soaking in cold water. Once prepared they were transferred to their respective containers and the dye applied.

The first 3 roving pieces used the same amount and colour (blue with a dash of red) of dye, and dyed in jars that were placed inside the stock pot.

The clamped piece had to be dyed in a small saucepan as the clamps, ties and blocks made it too bulky to fit in a jar. It *just* fit in the stockpot with the rest of the jars. It had what was left of the mixed up blue dye so it got a bit more dye than the other three. It has also picked up a little tannin – the brownish colour – from the wooden blocks. Forgot that … should have used plastic or glass.

Procion MX Dyes – an interesting experiment

Delineation
Delineation (click to enlarge)

The Procion MX experiment however proved most intriguing. Two colours – orange and purple – had been mixed up two weeks prior and left to “age”. I had a long piece of roving, folded in half, with one half in the orange dye jar the other half in the purple dye jar, sitting side by side in the stockpot. Both jars were filled to the rim with extra water, and the roving was deliberately dragged from one jar to the other and back to blend the colours.

During the steaming process however, the colours seemed to “unblend” and form quite a distinct hard line where they “met”. Most curious.

Merino MX blend line
Merino MX blend line (click to enlarge)

As the wool cooled the line became less distinct as some fibers pulled one way and others moved the opposite, but even dry there is no “brown” blended band.

Cool down

All pieces were left in the stockpot to cool overnight – a precaution that has saved every piece from felting since the first lessons learning experience.

The results once untied, rinsed and dried were pleasing across the board. The Shibori pieces exhibited their distinctive contrasting areas of dyed and undyed wool, and the Procion MX experiment continues to intrigue with little to no blending at the colour change point.

Merino roving dyed with Procion MX dyes using the acid dye method.


The Procion MX dyes did not produce the intensity of colour expected of them. This may have been a result of the cooler ambient temperatures slowing down the “ageing” process, or possibly a result of the extra water added to fill the jars. The remaining MX dye water has been preserved and bottled to “age” some more and will be re-used in a month or so.

The orange and purple MX experiment will be repeated in the coming months with some variations and at longer intervals to determine whether the delineation is repeatable and whether extra time and/or warmer ambient temperatures help in the dye ageing process.

Panoramas at 200mm

The Beechworth Celtic Festival last year was a painful reminder that carrying a heavy camera and lenses around all day was just not getting any easier! So this year I did what I’d been contemplating for some time and replaced my heavy and ageing Nikon D70 with a new micro-four-thirds camera – a Panasonic Lumix G10. To my delight and amazement not only was the camera half the weight of the D70 (even when fitted with a Belomo/Peleng Fisheye), it is twice the resolution, even though it has a smaller sensor!

I knew my collection of Nikon lenses were not going to be of use with the Panasonic G10, so I purchased a package with the 45mm-200mm lens and the standard 14mm-42mm. I knew I was going to miss my Nikkor 16mm, so I lashed out and bought a Belomo (formerly Peleng) 8mm fisheye lens for the G10 as well.

Snow on Bogong as viewed from Albury

On the 21st of July this year a photo opportunity I’d been watching for appeared briefly. From my studio there is a panoramic view out to the Hume Weir and mountains to the east, south and west. I’d been waiting for one of those cold, clear days when the snow on Mt Bogong became visible. This winter that view has all too often been obscured by clouds and/or rain. For an hour or so one Thursday morning the clouds, mist and haze cleared enough to get a reasonable view to the mountains.

This was the first test for the 45-200mm zoom lens, and it leaves a few things to be desired. At the same time, it was also quite a surprise, so a bitter-sweet experience. The first thing I noticed, which came as no great surprise, was that at full zoom – 200mm – it took ten shots to get what the 14-42mm lens @ 14mm could take in a single shot!

Unfortunately by the time I’d pulled all the images off the camera, converted them from the RAW format, checked them and tried a test stitch of the ten images, the clouds had closed back in over the tops of the mountains and the opportunity of a re-shoot was gone. I had seriously miscalculated the overlap on the first 3 images (lined up on the wrong trees) and there was quite a noticeable light fall-off (or vignetting) at the sides of the images.

200mm panorama from 10 images - bad vignetting obvious.
200mm panorama from 10 images - bad vignetting obvious. Click to enlarge.


It was the light fall-off that was going to cause the biggest headache. Initially it looked like it was going to require a re-shoot with almost a 50% image overlap! Fortunately as it turns out the weather did not co-operate so other alternatives had to be explored.

Since 2006 I’d been using a great product called PTGui to stitch partial, full and multi-row panoramas. It had continued to work fine for my needs so I’d not upgraded it in years. Researching software correction for vignetting I found my trusty PTGui had that capability – in the current pro version. Well, time and cameras move on, it was high time for an upgrade.

Within a few minutes of downloading and installing the update, loading the existing project file, a few intuitive settings in the HDR/Exposure tab and the fall-off was almost completely corrected! Impressed.

200mm panorama, same image set, vignette and exposure correction with PTGui Pro.
200mm panorama, same image set, vignette and exposure correction with PTGui Pro. Click to enlarge.


I’m still watching for favourable weather to shoot another set, possibly a late afternoon with the sun shining off the weir wall and the snow capped mountains.

Despite the light fall-off issue, I’m pleased with the clarity of the 200mm zoom on the micro-four-thirds sensor. Combined with the extra resolution (4000 x 3000 pixels) it can pick out a great amount of detail at quite a distance. The full frame 2nd image in the set for example, includes the Hume Weir wall.

Hume Weir Wall in the distance.
2nd image, full frame as shot, Hume Weir Wall in the distance. Click for 800x600.


Reduced to 50% and cropped for 800×600 it’s easy to see the wall, the gates, and to the side – the yellow drilling rig and the orange crane.

Hume Weir Wall detail.
Hume Weir Wall detail. Click for 800x600.


For a more detailed view of the snow, from Bogong to Feathertop, check the pano below (linked to a 1024×253 pixel image). Or for a really detailed version download this image (4483 x 1208 pixels – 426Kb).

Bogong to Feathertop
Bogong to Feathertop. Click for larger version (1024x253).