
As a designer and mixed-media artist, I relish the opportunity to learn something new, and this week marked the start of my Wool Dyeing course run on-line by Marjie McWilliams through Quilt University.
I had purchased some wonderful 19.5 micron Australian merino wool roving in late 2009 with the intention of either felting or dyeing it. This seemed like the ideal opportunity to put it to use.
The Dye Room
My “Dye Studio” as I loosely call it is a small room attached to my aviary complex. The room is used on a daily basis for aviary maintenance, cleaning food containers and storing all manner of useful things. It has a great, long, multipurpose workbench, a sink with running cold water and lots of storage space. Since my Batik It! class with Marjie in June of 2009 it also has a small LPG stove running off bottled gas. Great for melting bees wax and stewing natural dyes.
The beauty of using this space as my Dyeing room is that I can mix, paint and splash dye around to my hearts content without making a mess in the house. The workbench is covered in plastic, the sink bench is all tile and porcelain, the floor is tile and concrete or tough 2nd hand laminated “timber” flooring. It doesn’t matter if I spill, as it cleans up easily, although it doesn’t really matter if it stained, it would just add “character” to the room.
Day 1, the first Lesson part 1
Armed with Acid Dyes in the basic colours (red, yellow, blue and black), wool roving and lesson instructions I launched into an afternoon of simmering dye with enthusiasm.
I’d worked previously with wool before – a Felting workshop in Corowa and Needlefelting / Whisper Felting course also through Quilt Universtiy. I’d previously dyed cotton, silk, myself and assorted other fabrics and objects with chemically reactive Procion dyes and natural dyes. This was my first attempt at dyeing wool roving and my first serious occasion to use Acid Dyes.
The Acid Dyes we use come in powdered form, and as is Marjie’s way of teaching, we learn to mix our own colours. I found the Acid Dyes strange to mix at first. Cold water instead of the warm water I was used to with Procion Dyes, and unlike Procion Dyes which dissolve reasonably easily, the Acid Dyes behaved more like cornflour – going through a curious semi-gel stage before dissolving in additional cold water.

Getting the dye pot up to and stable at optimum temperature appeared as the first challenge. Just under simmering point eh? Not as easy as it sounds. LPG burns hotter than town gas. The little trivets on my 2nd hand stove top weren’t high enough to keep the pot under the simmer point, which at our altitude (approx 1000′) was happening at somewhere under 180F in the small dye pot. I found I had to keep lifting the pot off the heat to let it cool down. Things were not going too well.

Still, at the end of the 30 minutes the roving has taken on a wonderful orange colour from the Dye, and was ready for it’s cool down process. “Gradually” the instructions say. I’ve deliberately felted wool before so I know rapid temperature changes will turn roving into felt. So quickly move the wool from the hot pot to a bucket of hot water … but it doesn’t feel right. It’s felted already 🙁
Back to the class discussion room to ask for help.
Day 2, first Lesson reprise

Knowing from Day 1 we had a problem keeping the heat down, we’d managed to find a piece of rusty steel plate to use as a “heat spreader”. This worked quite well sitting on top of the trivets, keeping the pot further away from the flame. The dye pot wanted to start simmering at 165F, so that became our target. This time I had a lovely sunflower yellow piece of roving that looked really good, that is “un-felted”, in the dye pot.

BUT the process of moving it from the hot dye pot to the hot-but-not-as-hot-as-the-pot water bucket, no more than a second or two, was enough to send the roving into shock and it felted! Again!
Ok, challenge number 2 – cooling the roving without it felting. The ambient temperature in the Dye Room was 12.5C (55F), ok, pretty cold. Well, it IS the middle of winter here.
The Options
The first thoughts to come to mind was either adding slightly cooler water to the dye pot, or immersing the whole pot in the hot water bucket, then progressively cool the bucket. Neither likely to be terribly practical with parts 2 and 3 of Lesson 1 which involved gradation dyeing and 3 colour ways with 3 separate jars per roving piece each.
One of the articles Marjie had directed me to from her blog included a comment about leaving the brew for over 3 hours, and that it did not seem to change the dye colour much. Ok, why not leave the roving in the dye pot to cool?
Success!!!

Lesson 1 take 3 was a marathon effort – all 3 parts of lesson 1 in my big stockpot at the same time! A solid orange dye/roving; a gradation in shades of green; and 3 colour ways! Each colour had it’s own jar, and the pot itself was filled with water to the highest point I could without the jars trying to float or tip.

The temperature was fairly easy to manage, and got up to nearly 180F without boiling the pot water. I was concerned about the exposed roving between the jars getting chilled so I kept the lid mostly on the pot, only taking it off to check the temperatures, stir the pot water and spoon (used a 1/2 inch paintbrush actually) the dyes over the exposed wool from time to time.
The orange 3rd attempt at Lesson 1 part 1 did not get much of a stir as I already had two good solid (if felted) colours and wanted to see what not stirring would result in. A little mottling but good colour take-up over all.

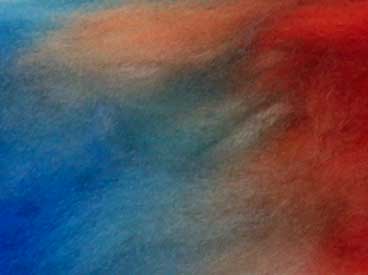
It took about 7hrs for the big pot to cool to nearly ambient, but it was WONDERFUL to finally see my Australian 19.5 micron merino roving come out of the wash buckets unfelted!!
Now it’s dry it is just so wonderfully vibrant, soft and warm to the touch.
Great result even if it took a while to get there! Looking forward to Lesson 2 next weekend!
